How to Build A Parapet or Double Sided Wall
The AB Fieldstone Collection can be used to build beautiful retaining wall structures and is versatile enough with its two-piece design, to build free standing parapets for patio enclosures, seating walls, fencing or planters. Finish off the top of a retaining wall or raised patio with a seamless transition, or build it on its own on an existing surface.
There are 2 options for building parapet walls:
- Standard - where the AB Dogbones connect the facing units together. Easily build corners and parapets with posts. Offers the smallest width, for straight walls only.
- Wider - where the AB Dogbones act as anchors in the wall rock allowing any size width to be created. Works well for straight and curved walls.
AB Dogbone Unit
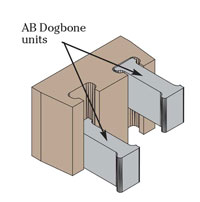
AB Fieldstone with AB Dogbone units
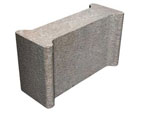
AB Dogbone
When building parapets the AB Dogbone unit will be needed along with wall rock to fill the center void between the blocks.
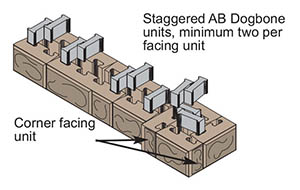
AB Dogbone units are half the height of the AB Fieldstone facing units and require a minimum of two per facing unit on installation. We recommend installing one at the bottom and one at the top of the facing unit in a staggered effect with wall rock in between.
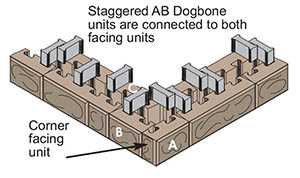
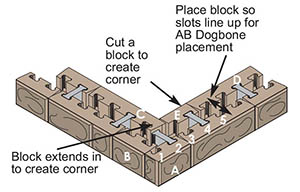
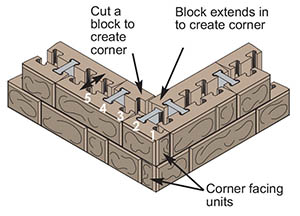
Standard Parapets with Corners
Standard parapets are built so the AB Dogbone units connect the back of the AB Fieldstone facing units on either side of the parapet, connecting the two sides together. Corners are easily created and finishing the end is done by installing a post. The facing units can be randomly flipped upside down to give different facing appearances. For curves, see the wider parapets section.
- Starting at the location of the corner, install an 812 corner facing unit (A) on the outside of the parapet wall. Place an 812 facing unit perpendicular against the outside corner unit (B) to create the corner. Ensure the textured side of the corner unit is facing out. Place a bead of flexible concrete adhesive between units to hold in place during construction (optional).
- Build out the parapet wall in both directions with 812 and/or 824 facing units in the pattern and length desired.
- Place one dogbone unit in the facing unit (B) to assist with placement of the inside parapet wall.
Parapet graphics are to show facing unit and AB Dogbone placements. All parapet installations need to include wall rock in cores.
Posts
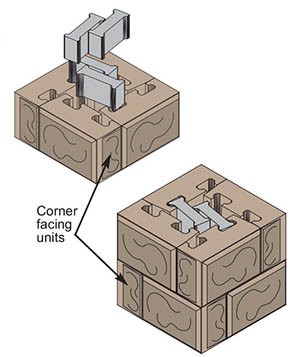
Stand alone posts are built using four corner facing units per course. These blocks have a textured side as well as a face. Wider posts can be built by adding cut or full length 812 facing units between each corner facing unit.
Every facing unit needs to have one AB Dogbone unit to secure it in place. Place a bead of flexible concrete adhesive between units to hold in place during construction (optional). Fill posts with wall rock in 4 in. (100 mm) lifts to allow for staggered placement of AB Dogbone units.
Parapets Post Caps
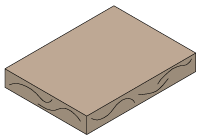
Finish the post off with two parapet caps for a clean finish.
Posts and Standard Parapets
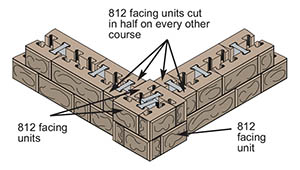
When building posts within the wall or ending a wall, corner facing units are not necessary where the wall meets the post as the textured side will not be visible. If the last post course extends above the parapet height, four corner facing units will then be needed.
On alternating courses, where a parapet wall meets a post, you will need to cut an 812 facing unit in half to offset from the seams below to allowing for proper AB Dogbone installation.
Parapet graphics are to show facing unit and AB Dogbone placements. All parapet installations need to include wall rock in cores.
Wider Parapets - Example 1
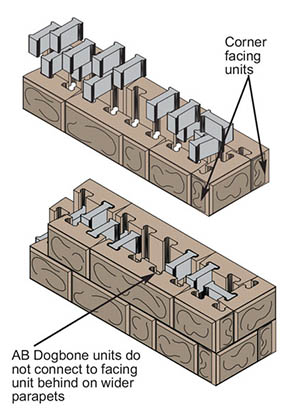
Building wider parapets will use some of the same installation details as a standard parapet. A minimum of two AB Dogbones units are needed per facing unit. Depending on the width chosen, cutting a block may be necessary to create the end of a wider parapet. Here are two examples on how to end the parapet wall.
- Starting at an end of the parapet, install two 812 corner facing units perpendicular to each other, textured side facing out. Place a bead of flexible concrete adhesive between units to hold in place during construction (optional).
- Place 812 and/or 824 facing units running down both sides of the parapet to the length desired. To finish, repeat previous step using two 812 corner facing units, textured sides facing out, to finish the first course. Ensure all facing units are level.
- Start placement of the staggered dogbone units. Place one dogbone unit per each facing unit the entire length of the wall. Dogbone units will not connect the facing units together.
- Carefully install wall rock in a 4 in. lift (100 mm) to the height of the lower dogbone units the length of the entire wall. External jigs or supports may be required.
- Place second dogbone unit in each facing units on top of the wall rock and level with or just below the top of the facing unit. Ensure each facing unit has a minimum of two dogbone units. Finish course by installing wall rock in a 4 in. lift (100 mm) to the top of the facing unit the entire length of the wall.
- On additional courses, use the same process as above, but reversing the corner blocks placement to stagger the seams from the course below. The facing units can be randomly flipped upside down to give different facing appearances.
- Repeat this process to height desired.
Wider Parapets - Example 2
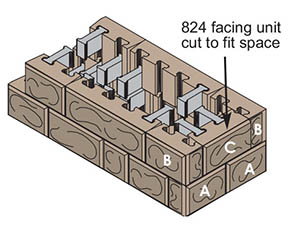
Wider parapets can be created by adjusting how the end is built. In this example one facing unit will need to be cut at the end of every course.
- Starting at an end of the parapet, install two 812 corner facing units side by side, textured side facing out, to create the end (A). Place a bead of flexible concrete adhesive between units to hold in place during construction (optional). Install facing units running down both sides of the parapet in the pattern and length desired. Ensure all facing units are level.
- Install dogbone units as shown above in 4 in. (100 mm) lifts.
- On next course, change the corner facing units placement by using two 812 corner facing units (B) and an 824 facing unit (C). The 824 facing unit (C) will need to be cut to fit. Place a bead of flexible concrete adhesive between units to hold in place during construction (optional).
- Repeat this entire this process to height desired.
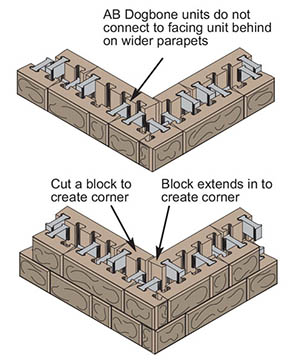
Wider Parapets with Corners
- Follow the standard parapet instructions shown above for facing unit placement to create the corner. When possible, always start the project at the corner. A minimum of two dogbones units are needed per facing unit, secure corner with a flexible concrete adhesive to hold in place during construction (optional).
- Space out parapet to the width desired. Place dogbone units and wall rock as done previously in 4 in. lifts (100 mm) to top of facing unit. Dogbone units will not connect the facing units together. External jigs or supports may be required.
Parapet graphics are to show facing unit and AB Dogbone placements. All parapet installations need to include wall rock in cores.
Wider Curved Parapets
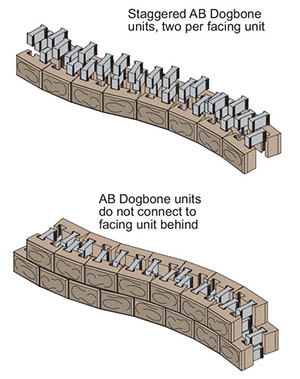
Curved parapets can easily be incorporated with any wider parapet application. For curved parapets to work, the walls need to have a wider spacing between them to fit the AB Dogbone units and allow the turn of the curve. The back slots of the facing units will not line up through the curve so using a standard parapet width is not possible. A minimum of two AB Dogbones units are needed per facing unit.
- To create the curve, start on one side of the parapet and install the 812 facing units in the direction of the curve or serpentine. Keep the front of the facing units tight together. If building a tighter curve, start on the outside curve side of the wall to limit any gaps that could appear. Install entire length of this side of the parapet wall, ensuring all facing units are level.
- Install one dogbone unit in the first facing unit in the curve to determine placement of back side of parapet. Place the back of an 812 facing unit against the end of the dogbone unit or spaced away farther to determine width of the parapet. Dogbone units will not connect the facing units together on curves.
- Once the spacing between the facing units is determined, measure between the backs of the two facing units and/or create a jig (piece of wood cut to size) to easily determine spacing of facing units for the rest of the wall.
- Install the remaining facing units to create the back side of the curved parapet wall using the measurement or spacing jig the length of the wall.
- Start placement of the staggered dogbone units. Place one dogbone unit per each facing unit the length of the wall. Dogbone units will not connect the facing units together. Adjust and align facing units as needed to fit.
- Carefully install wall rock in a 4 in. lift (100 mm) to the height of the lower dogbone units the length of the entire wall. External jigs or supports may be required.
- Place second dogbone unit in each facing units on top of the wall rock and level with or just below the top of the facing unit. Ensure each facing unit has a minimum of two dogbone units. Finish course by installing wall rock in a 4 in. lift (100 mm) to the top of the facing unit the entire length of the wall.
- If ending a curved parapet at a post or vertical end, cutting facing units to create the transition may be required.
- Install additional courses in same process, offset from the course below. The facing units can be randomly flipped upside down to give different facing appearances.
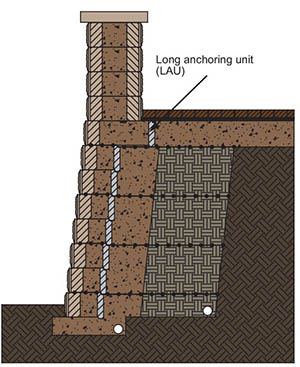
Retaining Walls and Parapets
If installing a parapet on top of an AB Fieldstone retaining wall, stack facing units so they are staggered from the blocks below so the seams are offset from the course below creating a clean transition. Use a course of long anchoring units (LAU) on the top course of the retaining wall to create a level surface to build the parapet on for easy installation.
Capping Parapets
Check with your local distributor for available options to cap the top of the parapets based on the width installed. Secure in place with a flexible concrete adhesive. Using a capping option that is slightly wider than the parapet is recommended. The extra overhang will create a nice finished effect.
Parapet graphics are to show facing unit and AB Dogbone placements. All parapet installations need to include wall rock in cores.

