Determine the layout of your enclosure and mark out a guideline for the placement of the walls and posts/pillars. This example incorporates corners and posts/pillars with the wall panels.
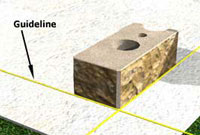
Start at the Corner
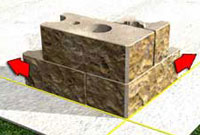
Build 2 courses at a time and build out from the corner in both directions
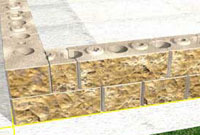
Build the Wall Panel
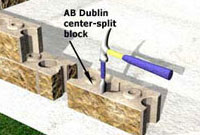
Split an AB Dublin Center-Split Block
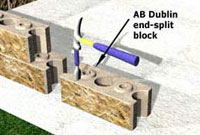
Split an AB Dublin End-Split Block
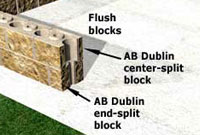
Place Split Blocks in Wall Panel
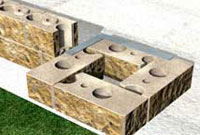
Build the First Course of the Post
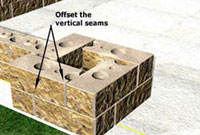
Offset the Vertical Seams
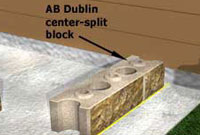
Build Next Wall Panel
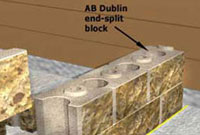
Build Second Course
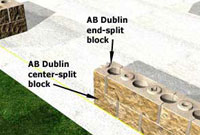
Use Saved Split Blocks
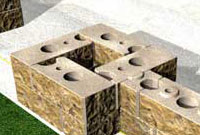
Build the Next Post
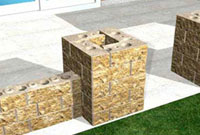
Build Additional Courses
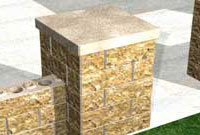
Install Post Caps
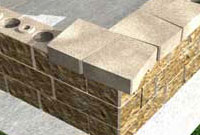
Cap the Corner
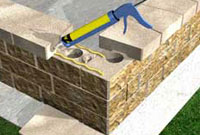
Secure Caps with Adhesive
Materials Needed:
- Corner Blocks
- AB York Blocks
- AB Dublin Blocks
- Wall Caps
- Post Caps
- Masonry Adhesive
Tools Needed:
- Square
- Measuring Tape
- String Line
- Saw with a Masonry Blade
- Hammer & Chisel
- Safety Glasses & Work Gloves
Step 2: Start at the Corner
If corners are in your design, always start the building process there and work out in both directions (Figure 1). Starting at the corner allows you to make adjustments if necessary at the end of the wall panels by splitting or cutting blocks. Adjustments should not be made at the corner or within the wall panels.
Place a Corner Block along the guideline at the corner location with the long side facing out. Then, split an AB Dublin end-split block along the splitting notch and place the large piece with the split side against the Corner block (Figure 1). Splitting the block creates a straight edge so there will not be a gap where the blocks meet. Learn more about splitting blocks.
Next build the second course of the corner, alternate the position of the Corner block to face the opposite direction of the one on the first course (Figure 1). Use the remaining small piece of the AB Dublin end-split block and place it with the split side against the Corner block to finish the second course of the corner. Installing the first two courses at the same time will ensure proper alignment of the entire project. Learn more about building corners.
Step 3: Build the Wall Panel
Begin building the first two courses of the wall panel out from the corner in both directions in the pattern you have chosen. In this example we are using a combination of AB York and AB Dublin blocks (Figure 3). Continue building in both directions to where the posts/pillars will be located.
The last block on every course of the wall panel next to the post/pillar or the house will be a split block (Figure 4). Using a split block allows the panel to be flush with the post/pillar. If a standard angled block shape is used there will be a gap where the panel and the post/pillar meet. If additional adjustments to the wall panel are needed, make them here before building the post/pillar.
To end at the post/pillar, alternate the split blocks used on every other course. We used an AB Dublin end-split block on every other course. Place the small piece with the split side facing out toward the post/pillar location. On the alternate courses we used an AB Dublin center-split block. Place one half with the split side facing out toward the post/pillar location. Depending on your wall panel pattern you may need to reverse the order of the split blocks on each course.
Step 4: Build the First Post
Install the first course of the posts/pillars with 4 Corner blocks with the long sides facing out (Figure 5) centered with the wall panel. Then align them with a square making adjustments as needed. Shims can be used to help level the blocks if the existing surface being built on is not level.
On the second course, place the Corner blocks so that they overlap the blocks beneath them. This pattern will offset the vertical seams. Learn more about building posts/pillars.
Step 5: Build the Next Wall
In this section, we are building the wall adjacent to the house (Figure 6). To do this we will repeat the same steps used when ending a wall panel at a post/pillar as shown in Step 2. To build a wall panel off any flat surface you will need to split blocks. Using a split block allows the panel to be flush with the house. Learn more about splitting blocks.
On every other course you will need an AB Dublin center-split block. On the alternate courses you can use either an AB Dublin end-split block or an AB York center-split block.
Use an AB Dublin center-split block to start the first course. Place one half with the split side against the house (Figure 7). Save the other half for the end of this course where it meets up with the post/pillar. Place the next block of the first course against the split block. We recommend installing the first two courses of the wall panel at the same time to ensure proper alignment.
On the second course, split an AB Dublin end-split block and place the large piece with its split side against the house. Save the small piece to use at the end of this course. Continue stacking the wall panel to the next post location using the pattern you have chosen, ending each course with the remaining split block used at the beginning of that course, with split side facing out.
Step 6: Build the Next Post/Pillar
At the end of the wall panel install the next post/pillar using the same layout as in Step 3. Then align them with a square. Place the next course of Corner blocks, making sure to offset the vertical seams from the blocks below.
Repeat steps 1-5 for any additional wall panels, posts/pillars or corners incorporated into your design.
Step 7: Build Additional Courses
Once the first 2 courses of the project are in place, stack additional courses on the posts/pillars and wall panels. Alternate the pattern on every other course until the desired heights are achieved. In this example we have built the posts/pillars 5 courses high and the wall panels 3 courses high.
Step 8: Finish with Caps
Finish each post/pillar with two Post Caps. To secure the Post Caps in place, apply a bead of masonry adhesive along the outside edge of the top course of Corner blocks and then set the Post Caps in place.
Finish each wall panel with Wall Caps. Starting at the corner place the two Wall Caps following the wall in the same direction. Place Wall Cap (A) with the long end facing the outside of the wall (Figure 8). Alternate the direction of the Wall Cap next to it for a straight wall.
Next place Wall Cap (B) on the other side of the corner. Place the short end of the Wall Cap facing the outside of the wall. Make adjustments as necessary to ensure they line up properly at the corner.
Secure the Wall Caps in place with a bead of masonry adhesive along both sides of the raised rings and along the sides of each Wall Cap.