Step 1: Fill and Compact the Trench
Step 1: Level the Trench
Step 2: Place Post Block and Level
Step 2: Use Post Spacer to Square Up and Align Posts
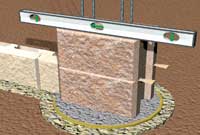
Step 3: Set Post Block, Level & Align
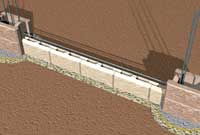
Step 3: Place Rebar
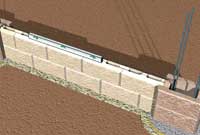
Step 3: Stack 2nd Panel Block Course then Level Panel Section
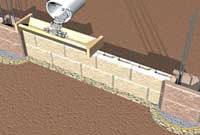
Step 4: Fill Cores with Grout
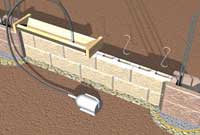
Step 4: Vibrate Grout and
Install Stirrups
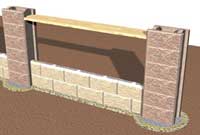
Step 5: Install Additional Post Blocks, Check for Plumb with Post Spacer
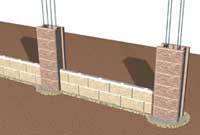
Step 5: Install Grout and Rebar
in Post Blocks
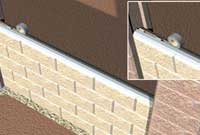
Step 6: Place Grout Stop Material
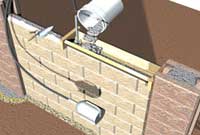
Step 7: Construct Bond Beam
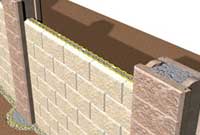
Step 8: Place Adhesive for Cap Placement
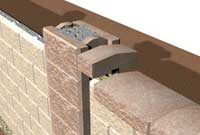
Step 8: Install Caps
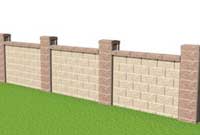
Step 8: Install Post Caps
How to Build Fence Posts and Panels
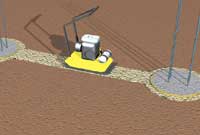
Step 1: Construct Base Trench
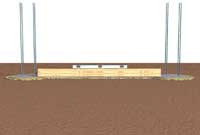
- Fill the trench between each hardened pile with 6 in. (152 mm) of wellgraded, granular compactible aggregate. In place of the compacted aggregate base, an unreinforced concrete leveling pad can be used. If a concrete leveling pad is used, provide expansion material between the ends of the pad and the sides of the piles.
- Screed the aggregate from pile to pile to create a level base for the fence panel.
- Use a mechanical plate compactor, or other acceptable means, to compact the aggregate.
- Check base for level using a hand level and screed. The base should be level with the piles.
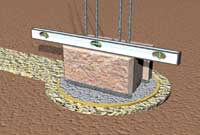
Step 2: Start with Fence Post Blocks
- Using a laser level, check the elevation of each hardened post pile.
- Fence post blocks may be placed on a mortar bed, a maximum of 1.0 in. (25 mm) thick, to achieve consistent starting elevation.
- A mortar bed may be required during the installation of the first fence post block to achieve a consistent starting elevation. Mortar must be the same strength or greater than the concrete mix used to fill the fence post block.
- Set the first AB Fence Post Block on each pile and/or on a mortar bed.
- Check the fence post blocks for level in all directions, and in a straight line from pile to pile, using a string line for reference.
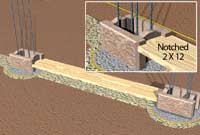
- Use the 2 x 12 fence post spacer shown in Figure 4 to help keep the fence post blocks square and aligned. When errors in spacing occur on fence post layout, adjustments should be confined to the fence panel between the two incorrect fence posts.
- Check for proper elevation from one fence post to the next using a laser level or leveled string line.
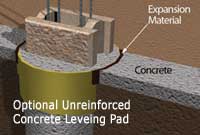
Option: Unreinforced Concrete Leveling Pad
If a concrete leveling pad is used, provide expansion material between the ends of the pad and the sides of the piles.
Step 3: Begin Building Fence Posts and Panels
- Once the first fence post block and mortar bed have hardened, stack a second fence post block on each fence post column.
- Check the fence post blocks for plumb; shim with asphalt shingles or other non-degradable material as necessary. Level in all directions.
- Note: Wooden door shims work well for the fence posts because they can be removed when concrete has set.
- Place a course of AB Fence Panel Blocks from fence post to fence post on the compacted granular aggregate base to form the bottom course of the bottom bond beam.
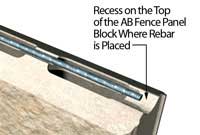
Rebar Placement in Bond Beam
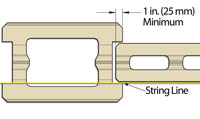
Block Tolerance
- The blocks should be installed level in all directions and in a straight line from fence post to fence post. Move the string line to provide a point of reference. A total deviation of 0.125 in. (3 mm) is allowable. The fence panels must extend 1 in. (25 mm) minimum into each fence post.
- Place a continuous piece of #4 (10M) rebar on the recess on the top of the first bond beam course.
- Rebar should be 3 in. (75 mm)shorter than entire fence panel section to allow for a 1.5 in (38 mm) clear cover at each end.
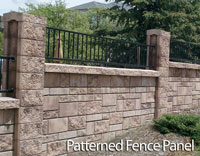
If building a patterned fence project, skip ahead to patterned fence construction to finish Step 3.
- Stack a second bond beam course of fence panel blocks. The fence panel blocks should be stacked so that the vertical seams align with the midpoint of the block on the course below in a "running bond pattern." A half fence panel block will be required at the ends of the fence panel on alternate courses. If a manufactured AB Fence Half Panel Block is not available, an AB Fence Panel Block must be cut in half to obtain a half fence panel block using a concrete saw with a diamond blade.
- Check the first two courses of fence panel block for alignment and plumb. Shim and adjust as necessary.
- Note: When cutting blocks refer to the appropriate MSDS sheets and wear proper safety gear.
Step 4: Add Grout to Bond Beam
- Fill the cores of the first two courses of fence panel blocks (bond beam) with fine (sand) mix concrete grout. Using a funnel to allow for easy installation and will keep the grout off the face of the fence panel block. Learn how to construct a funnel.
- As the cores are filled, place 9 ga vertical steel stirrups in the first two block cores at both ends and then in alternating block cores for the rest of the fence panel, making sure to meet the one per block minimum requirement. More information on stirrup construction and placement.
- Consolidate the grout with a concrete vibrator to ensure the cores on the bottom course are filled.
- Remove any excess grout from the top of the fence panel block and any spillage on the block faces. Allow the concrete grout to harden a minimum of four hours.
Step 5: Build Fence Posts and Align
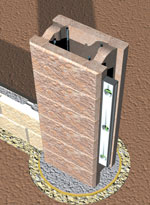
Check post for alignment and plumb
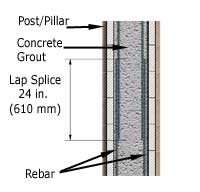
Rebar Lap Splice
- Stack additional fence post blocks in maximum of 6 courses or 4 ft (1.2 m) lifts. Always double check for alignment and plumb. Shim and adjust as necessary and brace as required.
- The 2 x 12 fence post spacer can be used by sliding it through the fence panel area.
- Next, fill the fence posts with grout or concrete mix in lifts not to exceed the 6 courses.
- Consolidate the grout or concrete with a concrete vibrator.
- If additional rebar is required, place it into the grouted cells in conjunction with the stacking of fence post blocks.
- Maintain a minimum lap splice of 24 in. (610 mm) when more than one length of rebar is required during construction of fence post. Check to see if there are local codes that require longer lap splices. Cold joints should be located in the middle of the block.
- Allow the concrete to harden a minimum of two hours.
- Fence post blocks must be installed within a ± ½° from vertical.
- If building a patterned fence project, skip ahead to Patterned Fence Contruction.
- Note: The AB Fence uses two different types of concrete during construction. The piles and AB Fence Post Blocks use concrete with gravel and sand size aggregate. This type of concrete is generally available from concrete plants and used in most types of construction. However, the bond beams require what is referred to as a fine mix concrete grout. This mixture of concrete uses only sand as the aggregate, which makes it ideal for filling the smaller cores of the AB Fence Panel Block.
Step 6: Build Fence Panel
- Stack the fence panel blocks in between the fence post columns up to the next bond beam position. The fence panel blocks should be stacked in a running bond pattern, paying attention to level and plumb.
- Before stacking the next two bond beam courses, place a 4 in. (100 mm) strip of grout stop material, such as duct tape or building paper.
- Stack the first bond beam course directly on top of the grout stop in a running bond pattern.
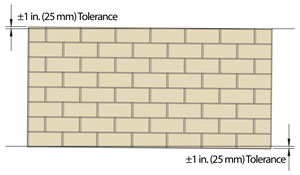
Vertical Panel Tolerance
- Place a continuous piece of #4 (10M) rebar on the recess on the top of the first bond beam course.
- Stack the second bond beam course in a running bond pattern.
- Seat and straighten the fence panel with a 4 ft level and a dead blow hammer by striking the front and back sides of the fence panel.
- Fence panels must be installed to a tolerance of ±1 in. (25 mm) in the vertical direction over the length of fence panel.
Step 7: Adding Caps to Panels
- Repeat Step 4 to grout the bond beam. Allow the concrete grout in this bond beam to harden a minimum of two hours. Repeat Steps 5 through 7 until design height is reached.
Step 8: Adding Caps to Fence Posts
- Place AB Fence Cap Blocks on top of the fence post columns and the fence panels. The cap blocks on the fence panel sections should be installed in a running bond pattern.
- Cut AB Fence Cap Blocks to fit each end of the fence panel with a concrete saw using a diamond blade.
- All cap blocks must be attached with a flexible construction adhesive designed for exterior use on concrete surfaces, such as an NP1 sealant or similar.
- Place a bead of flexible construction adhesive the length of the block on both angled contact surfaces between the caps and fence post or fence panel blocks.
- Using a 4 ft. level and a dead blow hammer, set caps in place to obtain a level top-surface.
- Note: When cutting blocks refer to MSDS sheets and wear proper safety gear.

